
How to Install Decorative Shelf Brackets Like a Pro?
Installing decorative shelf brackets like a pro involves a few careful steps to get it right. First, pick brackets that suit your shelf’s weight: L-brackets for lighter items or more robust ones with diagonal supports if you plan heavy loads. Use a stud finder to locate wall studs and mark them properly; this ensures strong fixing points, especially on drywall. Always measure twice and use a level when marking bracket placements to keep shelves perfectly horizontal. Pre-drill holes suitable for your wall type, drywall, masonry or tile, and secure the brackets with appropriate screws or anchors without overtightening. Finally, fit the shelf on top and fasten it down to prevent any wobble.
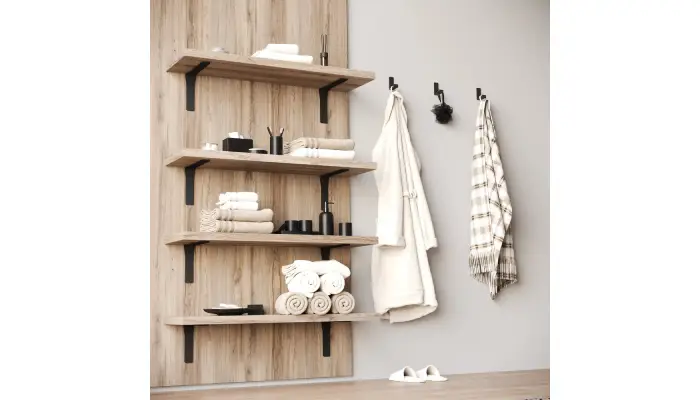
Choosing the Right Decorative Shelf Brackets
Selecting the appropriate decorative shelf brackets is key to achieving both stability and style. Begin by considering the expected weight of the items you’ll place on your shelf. For light loads such as small ornaments or picture frames, simple L-brackets are sufficient. However, for heavier items like books or kitchenware, opt for brackets with diagonal supports to provide extra strength and prevent sagging. Always check the manufacturer’s weight rating and plan the number of brackets accordingly: for light to medium loads, brackets spaced up to 24 inches apart usually work well, while heavier loads require larger brackets placed closer together. It’s also worthwhile to explore adjustable shelving systems such as standards or shelf tracks if you want the flexibility to change shelf heights or positions later on. Beyond strength, the bracket’s style and finish should complement your room’s décor; powder-coated finishes provide durability and a sleek look, while decorative scrollwork can add vintage charm. Choosing pre-drilled brackets can significantly ease installation, saving time and effort. Consider the material too, metal brackets offer durability, wooden ones blend well with traditional interiors, while plastic tends to be less sturdy and better suited for very light shelves. Make sure the bracket size matches your shelf thickness to ensure proper support and neat fit. Lastly, balance aesthetics with functionality by selecting a design that not only looks good but also allows straightforward shelf placement and secure fixing.
Gathering Tools and Preparing the Wall
Before you start installing decorative shelf brackets, assembling the right tools is essential. You will need a tape measure, a stud finder, a sharp pencil for precise marking, a spirit level to ensure straight lines, and a power drill equipped with drill bits suited to your wall type. For instance, wood bits are ideal for studs, masonry bits work best on brick or concrete, and specialised bits are necessary for drilling through tiles. Selecting the correct screws or anchors is just as important: use wood screws when fixing into studs, toggle bolts for drywall without studs, and concrete anchors for masonry walls. If your brackets come with bolts and nuts, have screwdrivers and wrenches ready. Identify your wall type clearly, be it drywall, masonry or tile, to choose appropriate fasteners and adapt your drilling technique accordingly. Double-check that your tape measure is accurate and your level is in good condition to mark perfectly straight lines. Make sure your drill batteries are fully charged and the drill bits are undamaged to prevent hiccups during drilling. Use a fine-point pencil for neat, exact marks on the wall surface. Keep all your hardware and fasteners organised in separate containers or trays to avoid confusion mid-installation. Lastly, don’t forget safety: wear goggles and gloves to protect your eyes and hands from dust and debris while working.
- Assemble essential tools: tape measure, stud finder, pencil, spirit level, power drill with suitable drill bits
- Choose drill bits appropriate to your wall type: wood bits for studs, masonry bits for brick or concrete, and special bits for tiles
- Select screws or anchors depending on wall type: wood screws for studs, toggle bolts for drywall without studs, concrete anchors for masonry
- Prepare screwdrivers and wrenches if your brackets use bolts and nuts instead of screws
- Identify your wall type clearly (drywall, masonry, tile) to select correct fasteners and drilling technique
- Ensure your tape measure is accurate and your level is in good condition to mark straight lines
- Check that drill batteries are charged and bits are undamaged for efficient drilling
- Use a pencil with a fine point for precise marking on the wall surface
- Keep all hardware and fasteners organised to avoid confusion during installation
- Wear safety gear such as goggles and gloves to protect against dust and debris
Locating and Marking Bracket Positions
Start by using a stud finder to locate the studs behind your drywall, marking their positions lightly with a pencil. This step is crucial because securing your brackets into studs provides the strongest support for your shelf. If the studs are too far apart or missing where you want your brackets, plan to use toggle bolts or heavy-duty anchors to ensure a secure fix. Next, use a spirit level to draw a straight, horizontal line where the shelf will sit; this helps keep all brackets perfectly aligned and the shelf level once installed. Mark your bracket positions along this line, aligning them with studs or your planned anchor points. Space the brackets according to the shelf length and the weight it needs to hold: generally, brackets should be no more than 24 inches apart for light to medium loads, closer for heavier items. When deciding exact bracket placement, consider surrounding furniture, the location of power sockets, and how you intend to use the shelf to avoid interference or inconvenience. Double-check measurements from the floor or adjacent walls to maintain consistency with other elements in the room, ensuring a neat, professional finish. Avoid marking brackets where cables, pipes, or other hidden utilities might run; if unsure, consult a professional or use a utility detector. For clearer markings that won’t smudge during installation, apply small strips of masking tape on the wall and mark on the tape instead of directly on the paint. If installing multiple shelves, carefully measure and mark each shelf height to keep spacing uniform and visually balanced. Always review every marking before drilling to prevent mistakes that could lead to unnecessary holes or patching later on.
Drilling Accurate Pilot Holes
Pre-drilling pilot holes at your marked bracket positions is essential to guide screws correctly and to prevent any damage to the wall. When working with drywall that lacks studs, it’s important to drill holes exactly sized for the toggle bolts or anchors you plan to use, ensuring a secure fit. For masonry walls, use a masonry drill bit and, if you have one, a hammer drill to achieve clean, precise holes that will hold your anchors firmly. When drilling into tiles, place a piece of masking tape over the spot to reduce the drill slipping and to protect the tile from cracking. Begin drilling at a slight angle to create a small indent before moving to drill straight on with a masonry bit. Drill slowly and steadily to avoid heat build-up, which can cause tiles to crack. Keep the drill perfectly perpendicular to the wall surface so the holes are straight and the brackets align properly. After drilling, use a level to double-check the holes are still perfectly aligned and level; if not, patch the holes and start again to avoid crooked shelves. Clean out dust from the holes with a small vacuum or brush before inserting anchors to ensure a snug fit. Always remember to wear eye protection during drilling to safeguard against flying debris.
Fixing the Brackets Securely
To fix your decorative shelf brackets securely, start by selecting the right screws or anchors for your wall type. For wooden studs, use quality wood screws; for drywall without studs, toggle bolts provide better support, and concrete anchors are essential for masonry walls. When installing on tiled walls over studs, lag bolts are recommended to hold firmly without cracking the tiles. Insert screws or bolts through the bracket holes carefully, tightening them by hand first to avoid stripping or damaging the wall, then use a screwdriver or wrench to secure them firmly but never overtighten. Keep each bracket level and stable before moving on to the next, as this ensures your shelf will be straight and properly aligned. Avoid plastic wall plugs for heavy loads; metal anchors or toggle bolts offer greater strength and reliability. Make sure the bracket arms are positioned correctly to fully support the shelf, and keep screws and bolts flush with the bracket surfaces to prevent snagging or uneven shelf placement. Once all brackets are fixed, apply light pressure to check for any movement, if you notice any wobble, adjust the fixings accordingly. Finally, double-check every screw and anchor to ensure your installation is safe, durable and ready to hold your shelf with confidence.
Fitting and Securing the Shelf
Place the shelf carefully onto the fixed brackets, making sure it fits snugly on the bracket arms. If you’re using wooden shelves, it’s wise to pre-drill holes underneath where the shelf meets the brackets to avoid splitting the wood when you screw it down. Once aligned, secure the shelves to the brackets with screws to prevent any slipping or movement over time. Before tightening fully, use a spirit level on the shelf surface to confirm it sits perfectly horizontal. If the shelf has any uneven thickness or warping, gently sand the underside or adjust the bracket screws to level the surface. Be careful not to over-tighten screws into the shelf, as this can cause damage or cracking. Check that the finished shelf edge aligns neatly with the brackets for a tidy look, and ensure the shelf overhang is even on both ends for balance and safety. If installing multiple shelves, repeat these steps, maintaining consistent spacing and alignment. Finally, clean the shelf surface to remove any dust or marks left during installation, leaving your shelf looking professional and ready to use.
Tips for Installing on Different Wall Types
When installing decorative shelf brackets, the type of wall you’re working with greatly influences the fastening method. For drywall, always try to secure brackets directly into studs for the strongest hold. If studs aren’t available where you need them, opt for toggle bolts or heavy-duty anchors specifically designed for drywall. Avoid plastic anchors on heavy shelves as they’re prone to failure. Masonry walls such as brick or concrete require a masonry drill bit and concrete anchors to firmly fix the brackets. Using a hammer drill here can make the job easier and more efficient. When dealing with tiled walls, take extra care: place masking tape over the drill spot to reduce cracking, drill slowly with a masonry bit, and if possible, secure brackets with lag bolts into studs behind the tiles. For hollow walls, expanding anchors made for such conditions offer better stability. Always consider the wall’s thickness and condition before choosing fixings; older walls might have brittle plaster or hidden defects that could compromise bracket strength. If you’re uncertain about the wall composition, test drilling in a concealed area first helps avoid costly mistakes. Taking these precautions ensures your shelves are not only attractive but also safely supported regardless of wall type.
Best Practices for a Professional Finish
To achieve a professional finish when installing decorative shelf brackets, start by measuring twice and marking carefully before drilling to avoid mistakes and wall damage. Use a reliable stud finder to locate studs accurately and a good spirit level to ensure your markings and installed brackets are perfectly horizontal. For longer shelves, add extra brackets to distribute weight evenly and prevent sagging over time. When selecting brackets, balance strength with design; a well-chosen bracket not only supports the shelf securely but also enhances the room’s décor. Avoid plastic plugs for heavy-duty shelves; metal anchors or toggle bolts provide far better security and longevity. Be cautious not to overtighten screws, as this can strip the fixings or damage the wall. If you make a mistake, patch any holes with spackle, sand smooth once dry, and repaint before attempting to drill again. Keeping your workspace tidy and promptly cleaning dust or debris helps maintain a neat finish and prevents scratches or stains on your walls and shelves. Consider pre-finishing or painting your shelves before installation to save time and protect the surface from damage during fixing. Finally, take photos once your shelves are installed; these can be useful for future reference or if you need to replicate the setup elsewhere.
Common Mistakes to Avoid When Installing
One of the most frequent errors is failing to locate wall studs or relying on inadequate anchors, which can make shelves unstable and unsafe. Always use a reliable stud finder and choose the correct fasteners for your wall type; for example, toggle bolts for drywall without studs or concrete anchors for masonry. Skipping the spirit level when aligning brackets often results in crooked or uneven shelves, so take the time to ensure everything is perfectly horizontal. Another common mistake is overloading shelves beyond the bracket’s rated capacity, which risks bracket failure and damage to both the shelf and wall. Using the wrong drill bits or fasteners for your specific wall can cause poor anchoring or even damage the wall surface; for instance, masonry bits are essential for brick or concrete walls, while wood bits suit stud mounting. Rushing the job can lead to overtightening screws, stripping fixings or damaging the wall, so tighten screws carefully and steadily. Incorrect bracket spacing, such as placing them too far apart or unevenly, can cause sagging or imbalance; brackets should generally be no more than 24 inches apart for light to medium loads, closer for heavier shelves. Neglecting to pre-drill holes in the shelf itself often causes wood splitting when attaching it to brackets, so always pre-drill where screws will go. Another safety oversight is failing to check for hidden cables or pipes behind the wall before drilling, which could lead to serious hazards or costly repairs. Lastly, skipping basic safety precautions like wearing goggles or ensuring drill bits are in good condition may seem minor but protects you from avoidable injuries and ensures a smoother installation.
Useful Resources for Visual Guidance
o really get the hang of installing decorative shelf brackets like a pro, visual aids can be a great help. Watching tutorial videos from trusted sources such as The Home Depot or popular DIY YouTube channels offers clear, step-by-step instructions that can boost your confidence and skill. Mobile apps designed to locate studs and provide handy installation tips are also worth using, especially if you’re working with drywall. Checking manufacturer websites is essential too, as they often provide specific guidelines for bracket installation and detail weight ratings to ensure safety. Online forums and DIY communities can be invaluable for learning from others’ experiences, offering advice and solutions to common challenges. For those unsure about their wall type, downloadable guides can help identify surfaces accurately, influencing the choice of tools and fixings. To visualise how your shelves and brackets will look, interactive tools or augmented reality apps allow you to plan placement before you drill any holes. When selecting brackets, product reviews and installation videos reveal which options are easiest to fit and most durable. Don’t overlook downloadable templates that assist in marking bracket positions precisely, which makes a big difference during installation. Improving your technique with safety and tool usage videos can reduce mistakes and accidents. Finally, keeping a list of local hardware stores with knowledgeable staff means you have in-person support when needed, rounding out a comprehensive set of resources to guide you through the entire process smoothly.
Frequently Asked Questions
1. What tools do I need to install decorative shelf brackets properly?
You will typically need a drill, a spirit level, a tape measure, a screwdriver, wall anchors or plugs (if fixing to drywall), screws suited for your bracket and wall type, and a pencil for marking. Having these ready ensures a smooth and secure installation.
2. How do I find the best position on the wall for shelf brackets?
Start by measuring the desired height and width of your shelf. Use a spirit level to mark horizontal lines where brackets will sit, ensuring they are evenly spaced and aligned. It’s important to fix brackets into studs or use appropriate wall anchors to support the weight safely.
3. What is the correct way to fix brackets to different wall types like plasterboard or masonry?
For plasterboard, use suitable wall anchors or toggle bolts to provide extra support, as screws alone won’t hold well. For masonry walls, use a hammer drill with masonry bits and wall plugs before driving the screws in. Matching fixings to the wall type is key to a stable installation.
4. How can I ensure the shelf will be level and stable after installation?
Use a spirit level before drilling to mark the bracket positions precisely. Check level again after fixing each bracket. Tighten screws firmly but avoid overtightening, which can damage the wall or bracket. Finally, place the shelf on the brackets and confirm it remains level and steady.
5. Are there any tips for installing decorative brackets without damaging the wall or shelf?
Yes, start by marking carefully before drilling to avoid unnecessary holes. Use correct wall anchors to prevent cracking. If working with wooden shelves, pre-drill screw holes to avoid splitting. Also, avoid heavy loads until the brackets and shelf have settled firmly in place.
TL;DR This guide covers how to install decorative shelf brackets correctly and efficiently. Start by choosing brackets suitable for your shelf load and style, then gather the right tools and identify your wall type. Locate studs or use appropriate anchors, mark bracket positions carefully with a level, and drill pilot holes with attention to wall material. Secure the brackets firmly without overtightening, then fit and fix the shelf, ensuring it’s level. Tips for drywall, masonry, and tile walls help avoid common issues. Follow best practices like measuring twice, using quality anchors, and avoiding common mistakes such as poor levelling or overloading. For visual learners, video tutorials and apps can provide helpful support. With these steps, even beginners can achieve sturdy, attractive shelving like a pro.

Kristy Blanchard is a Kansas-based writer and blogger. She has a passion for writing and exploring different cultures. She has a degree in English Literature and is currently studying marketing. She spends her free time exploring Kansas and always has a new story to tell. She loves to share her experiences in her blog, where she writes about everything from fashion and food to travel and culture.


